
 Latest images
Molded Splash Guards (aka Mud Flaps)
Page 1 of 1

Molded Splash Guards (aka Mud Flaps)
![]() by WickedSlow Mon Dec 29, 2008 12:43 am
by WickedSlow Mon Dec 29, 2008 12:43 am
These "splash guards" are OEM aftermarket parts specifically for the Ford Fusion. Installation was pretty easy, the first one took a while, but the other three were a breeze.
The package just out of the box:


Now for the fun part...
Tools needed:
- a couple flathead screwdrivers (or a trim panel remover tool)
- drill & 1/4" drill bit
- paper towels or rags (to clean parts & use to keep your tools from scratching the car's paint)
NOTE: You DO NOT need to jack up your car or remove the wheels to install these. I installed all 4 withough doing either. If your car is lowered, however, jacking it may make things easier because installation does require drilling a hole up through the very bottom lip of each rear quarter panel.
The general installation process:
1) Clean wheel well & the body just behind each wheel well thoroughly
2) Turn front wheels all the way to the left, and begin with the left-front splash guard
3) Remove to two bottom-most trim retainers
4) Align splash guard with the two holes and re-insert retainers (large outer piece of each first, then the small pin second)
5) Drill (don't worry, it'll be ok) a 1/4" hole through the wheel well trim lined up with the third hold in the splash guard
6) Use the supplied retainer & screw combo supplied with the kit to secure the last hole in the guard to where you just drilled.
7) Turn wheels the other direction and repeat for the right-front side
8 ) Move to the back wheels (pick a side to start with)
9) This time, remove the bottom-most retainer and the retainer at the very inner-bottom of the wheel well trim that faces the center of the vehicle
10) Same deal as before, line up splach guard, reinstall the clips you removed, but the kit gives you longer retainer pins for the inner-bottom holes because the splashguards to sit close enough to the holes you removed the original retainers from.
11) Drill two holes for each guard, one through the top most hold on the guard, and one underneath the bottom lip of the rear quarter panel
12) use the supple metal clips & screws to secure the splash guard in each of the holes you just drilled.
13) Repeat steps for the other back side
14) Clean up and admire the new splash guards, you're finished!
Pics of the install

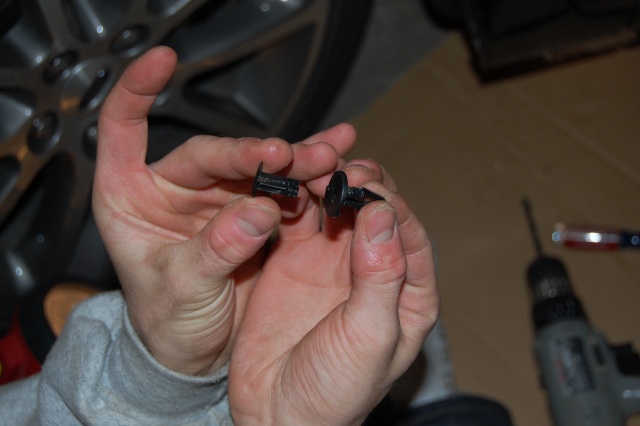
Trim retainer removal

This is what the pins look like, you pop the inner piece out first, then the large outer piece. Do the reverse to reinstall.
Already in place with stock retainers reinstall, this is where you have to drill another hold for the front splash guards

And this is the insert & screw supplied with the kit

Front-left done

Now for the back, the process is pretty much the same, but the drilling is in slightly more confined spaces.
Here's drilling the top hole (yes that's me)

And the drilling up through the bottom

and finally...
FINISHED PICTURES


The package just out of the box:
Now for the fun part...
Tools needed:
- a couple flathead screwdrivers (or a trim panel remover tool)
- drill & 1/4" drill bit
- paper towels or rags (to clean parts & use to keep your tools from scratching the car's paint)
NOTE: You DO NOT need to jack up your car or remove the wheels to install these. I installed all 4 withough doing either. If your car is lowered, however, jacking it may make things easier because installation does require drilling a hole up through the very bottom lip of each rear quarter panel.
The general installation process:
1) Clean wheel well & the body just behind each wheel well thoroughly
2) Turn front wheels all the way to the left, and begin with the left-front splash guard
3) Remove to two bottom-most trim retainers
4) Align splash guard with the two holes and re-insert retainers (large outer piece of each first, then the small pin second)
5) Drill (don't worry, it'll be ok) a 1/4" hole through the wheel well trim lined up with the third hold in the splash guard
6) Use the supplied retainer & screw combo supplied with the kit to secure the last hole in the guard to where you just drilled.
7) Turn wheels the other direction and repeat for the right-front side
8 ) Move to the back wheels (pick a side to start with)
9) This time, remove the bottom-most retainer and the retainer at the very inner-bottom of the wheel well trim that faces the center of the vehicle
10) Same deal as before, line up splach guard, reinstall the clips you removed, but the kit gives you longer retainer pins for the inner-bottom holes because the splashguards to sit close enough to the holes you removed the original retainers from.
11) Drill two holes for each guard, one through the top most hold on the guard, and one underneath the bottom lip of the rear quarter panel
12) use the supple metal clips & screws to secure the splash guard in each of the holes you just drilled.
13) Repeat steps for the other back side
14) Clean up and admire the new splash guards, you're finished!
Pics of the install
Trim retainer removal
This is what the pins look like, you pop the inner piece out first, then the large outer piece. Do the reverse to reinstall.
Already in place with stock retainers reinstall, this is where you have to drill another hold for the front splash guards
And this is the insert & screw supplied with the kit
Front-left done
Now for the back, the process is pretty much the same, but the drilling is in slightly more confined spaces.
Here's drilling the top hole (yes that's me)
And the drilling up through the bottom
and finally...
FINISHED PICTURES

WickedSlow- Posts : 45
Join date : 2008-05-23
Location : Carlisle, MA -

Page 1 of 1
Permissions in this forum:
You cannot reply to topics in this forum|
|
|